Well one of the goals on my list for 2012 was to write a few tutorials for my blog. The problem is most of the things I make are from a pattern, or quilt along, or are very heavily influenced by someone or something I have seen. Well I had this idea floating around in my head for a while for a patchwork pinwheel but didn't want to take the time to figure out all the little triangles and I mean really who wants to spend all that time cutting anyway. So I came up with a quick and easy patchwork pinwheel block for a round robin bee I am in and decided I would take pictures and share with you all. Now this is the very first tutorial I've ever written so please bear with me, but if you have any questions just ask. Also because blogosphere is so big I'm also sure I'm not the first person to do this. I've never seen it done but I also didn't search all over the Internet either. Okay now that all of those bits are out of the way lets get started.
 |
| Patchwork Pinwheel |
I made my block to finish at a 5 inch square. But you could very easily use this method to make a much larger or smaller block. To start you want to cut an assortment of squares. For my block I started with 2 inch squares, if you are making a larger block you may want to increase the size. For the 5 inch block I started by sewing a simple 4 patch. You will need two(2) 4 patches for each block. If you are making a larger block increase your four patch to a six or nine patch for a larger size. Or increase the size of your squares from 2 inches.
 |
| Star by making two(2) 4 patches. |
Next you will need to cut 2 squares of you solid (alternate) fabric. Now draw a line on the back of your solid block from corner to corner and sew 1/4 of an inch seam on each side. I use this handy tool called a Magic Wand that I picked up a few years ago. It is a 1/2 inch wide with a laser line down the middle and I use it to make all of my Half Square Triangles.
 |
| Mark your sewing lines on the solid |
Now you want to cut on the line you drew and press your half square triangle units. Then trim to size. For my 5 inch finished block I used a 3 inch HST. Another handy tool I recommend having in your quilting arsenal is a ruler made for squaring up HST units. Mine is the Tucker Trimmer and it works for HST units as small as 11/2 inches all the way up to those that are 61/2 inches big.
 |
| Cut your blocks down the middle after sewing |
 |
| Square up your HST units |
 |
| HST Unit once it is squared up |
Then layout your HST units into the pinwheel that you want. I played with mine a lot until I got the symmetry I wanted since I had repeated fabrics in my two four patches this was a little more tricky then it probably should have been.
 |
| Lay out you block how you like it. Sew your blocks into 2 rows and then sew your rows into a finished block. |
Sew your two squares into a row and then sew your two rows together into a finished block and woo hoo you have made a easy peasy patchwork pinwheel. If you make one I'd love to see it. Leave me a comment with a link so I can check it out. And remember if you have any questions just ask, I'd be happy to answer them.
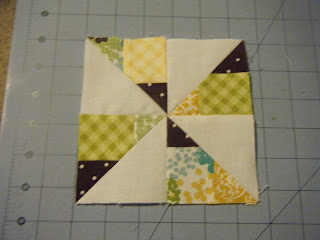 |
| Press your finished block and enjoy! |


Thanks for the great tutorial! I've pinned it and think it will make an awesome quilt. What a great scrapbuster!
ReplyDelete